

What Parts Are Needed To Change Disc Brake Pads
How to Replace Disc Brake Pads and Rotors
When Disc Brake Pads and Rotors need to be Replaced – and How to Do It!
Now that disc brakes are on all your bikes – route and mountain – the time is now to learn how to tell when your disc restriction pads and rotors are worn out and how to replace them. Cheque out our video and go the nitty-gritty details on how it'south done below.
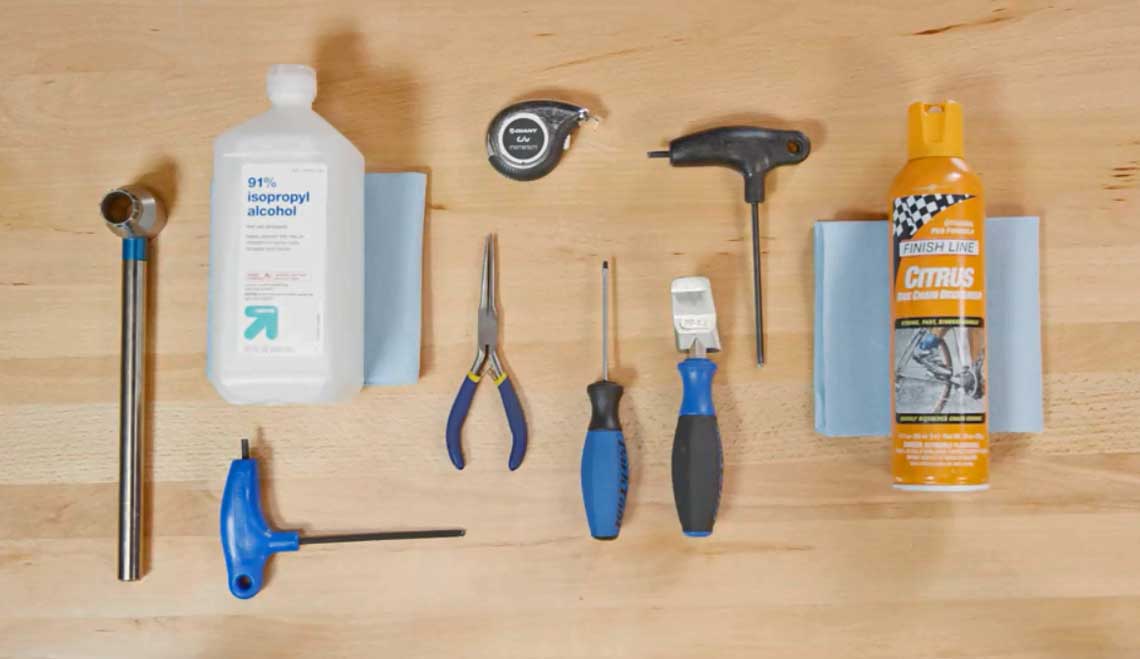
What You'll Need
- Measuring Tape
- T25 Torx wrench
- 5 mm Allen wrench
- Flathead screwdriver or Disc Brake Pad Spreader
- Needle Olfactory organ Pliers
- Cassette tool (road bicycle rotors)
- Isopropyl Alcohol
- Degreaser
- Make clean rag or lint-gratis material
How to Check Disc Brake Pads for Article of clothing
Somewhen, the brake pads on your bike will wear out! How ofttimes will your pads demand to be replaced? That volition depend on how often you ride, what the terrain is similar where you lot ride, and what conditions yous ride in. Riding in wet/muddy conditions or on steep roads or trails will mean yous will need to replace your brake pads more often. You should cheque your restriction pads periodically for wear, here'due south how:
- Remove your wheel from the bike. Information technology volition exist easier to look at the restriction pads without the rotor in between them.
- Look downwardly into the caliper to meet how much pad remains on the metal bankroll. Sometimes you can tell right away that your pad is worn out, or information technology still has enough to get y'all through the adjacent few rides. If yous aren't sure, remove the brake pads. Yous'll need to remove the retaining pin to go the pads out of the caliper. For basic data about parts of the disc restriction, how to remove the disc brake pad, and how to remove contamination, check out our guide HERE>
- Measure each restriction pad. If there is less than 1mm of pad material, those pads need to exist replaced!
- Some other reason for replacing disc restriction pads is if the pad becomes contaminated with brake fluids, oil or grease.
How to Check Disc Brake Rotors for Habiliment
Rotors tend to last longer than restriction pads, but still should be checked periodically for wearable. Here's how:
- Measure the thickness of an unused part of the rotor (like the heart, spider area)
- Measure out the thickness of the used edge of the rotor. If the deviation is between .2 - .five mm, and then it is time to supersede.
- You can as well feel if there is significant wear in your rotor by using a paper prune or a pick and running it from the unused portion of the rotor to the used portion. If y'all can feel a ridge or a pace in the surface, so you probably need to supercede the rotor.
- Other reasons you could need to replace the rotor include: damaged or severely bent rotor, upgraded/ new size rotor.
How to Replace Disc Brake Pads
When replacing disc brake pads, the first thing to consider is what blazon of pads you are using. Always replace your pads with the Same TYPE of pad material, unless y'all plan on replacing both the pad and the rotor. Pads tin can exist ORGANIC (resin) or METALLIC (sintered). Metallic pads tend to last longer and are a skilful choice if you are riding steep roads or trails in adverse weather condition. Organic pads are very responsive, but they volition need to be replaced more often. If you live in an area that is flatter and yous ride in mostly dry conditions, organic pads could be a adept pick. Also, brand sure you purchase pads that are compatible with your caliper. The brand and model of your brakes should be listed on the replacement pad packaging. Here'south how to yous'll supercede those pads:
- Using a pad spreader or flathead screwdriver, push the pistons dorsum into the caliper. This will make it easier to put the new pads in and prevent them from rubbing the rotor.
- Remove the old pads. You lot may demand a screwdriver or Allen wrench to remove the pin that holds the pads in place.
- Once the pads have been removed, make clean the inside of the caliper/pistons with degreaser. This will ensure your pistons are moving properly and non stuck in place. Wipe the caliper make clean. You exercise not want to leave backlog degreaser inside the caliper, every bit it could contaminate the new pads.
- Place the new pads into the caliper, making certain you exercise not affect them with your fingers. The oils on your fingers can as well contaminate the new restriction pads.
- Secure the new pads with commodities/pin provided in the package.
How to Replace Disc Brake Rotors
First, cheque to brand sure you have the right replacement rotor and tools for the chore. There are two dissimilar kinds of rotors: half dozen-Commodities and CENTER-LOCK. Near newer mount bikes will come up with vi-bolt rotors and road bikes tend to come with heart-lock rotors. Here'southward how to replace your rotors:
- Remove the old rotor. Apply a cassette tool for eye-lock and a T-25 Torx wrench for most mount bike half-dozen-bolt rotors. Your new rotor will probable come with new bolts merely retain the sometime bolts for backup.
- While the rotor is removed, utilize the opportunity to make clean those difficult to attain areas of the hub.
- Take hold of your new rotor. Make sure the pointer is pointing in the direction of the wheel'due south rotation before yous tighten.
- When tightening the bolts on a 6-bolt rotor, do so in a star pattern.
- When replacing a center-lock rotor, replace the cease cap and make the first few rotations by hand to ensure the cap is properly threaded. Then, use a cassette tool to tighten.
- Always make certain yous tighten bolts to torque spec indicated by the manufacturer.
- Never utilise grease or lube on brake rotor bolts. Heat that occurs during heavy breaking could cause grease to seep out and contaminate the rotor and pads.
- The threads of a center-lock rotor end cap and bolts of a 6-bolt rotor should come up with pre-applied thread lock. If at that place is none, apply a single driblet of thread lock to each commodities hole and wipe abroad excess.
- It's always a good idea to use Isopropyl alcohol to remove whatsoever contamination from the new rotor before replacing the wheel.
- Supercede the bike and check to make sure the caliper is properly aligned (no brake rub). If there is restriction rub, use our guide on how to fix squeaky disc brakes to realign your caliper!
How to Bed-In Disc Brakes
All disc restriction pads and rotors demand to be "bedded-in" or pre-worn before your first ride. This prevents excessive racket and will ensure even and predictable braking. Basically, your goal is to heat upward the pads and rotors, depositing an even layer of pad material onto the rotor (or braking surface). Here is how to practice it:
- Observe a vacant parking lot or tranquillity neighborhood street where you can ride safely.
- While seated on your wheel, accelerate to a moderate speed.
- Apply both the brakes firmly and evenly but DO NOT come to a complete stop. Let off the brakes gradually.
- Repeat this process 15-30 times until you feel the brakes bitter with more than power.
- Let your brakes absurd downwardly before your start ride.

Source: https://www.liv-cycling.com/global/campaigns/how-to-replace-disc-brake-pads-and-rotors/23349
Posted by: fleisherboulciance1971.blogspot.com
0 Response to "What Parts Are Needed To Change Disc Brake Pads"
Post a Comment